Overview of Clinical Reporting
Note
This document is part of the OICR Genomics Quality Management System : TM-005 Data Review and Reporting Procedure🔒
The report generation procedure involves trained CGI staff carrying out specific additional analysis and interpretation of variant calls and quality metrics output by the standardized bioinformatics pipelines. Either the CGI manager or an assigned member of CGI acts as a clinical reporting lead. Details on this role are outlined on the wiki page🔒. They are responsible for checking the status clinical reports on Dimsum🔒 and delegating. Interim clinical reports are generated using Djerba. CGI then generates a draft report by interpreting and editing the interim report for subsequent review and sign-out by a geneticist.
In brief, the procedure follows these steps:
Set up a working directory to contain intermediate files
Create the report - these steps are assay specific
Review Draft Report meets ISO requirements
Download the quality control (QC) report using the case report button in the Dimsum system.
Upload the draft report and QC report to the Requisition System for review and sign-out by a Geneticist (see Requisition and Reporting System Manual).
If a report is rejected by the Geneticist, it must be reviewed and resubmitted.
For considerations of variant classification, incidental findings and analytical methodology changes, see Additional Considerations at the end of this document.
Terminology:
- Donor
refers to the MISO-generated patient identifier (eg. OCT_010118)
- Requisition
a unique ID used to track the assay request for service. The requisition ID is the organizing unit of a case. It is identified through the requisition-system and each requisition will lead to one report. There may be multiple requisitions for one donor therefore we focus specifically on requisitions as the functional unit.
- Project
refers to the project name as entered in the LIMS (eg. OCTCAP)
- groupID
a unifying identifier for a group of libraries (or just one library) that will be analyzed as a unit. For example, top-ups will be grouped under one group-id. Similarly, several extractions from one tumour sample can be analyzed together under one group-id. Libraries with the same group-id are merged in the pipeline. DNA and RNA libraries use the same groupID (e.g. OCT-01-0118-TS) to define an analysis to be completed together. The groupID is an identifier used in MISO which indicates libraries that are to be processed together, thus resulting in a call-ready bam file. In other words, two samples derived from the same tissue with the same groupID will be merged into a single bam file. Often, the groupID is equivalent to the “Sample Study ID” from the sample requisition system as described in the TM. Sample Accessioning Procedure SOP.
In this SOP, the donor alias OCT_010118 or ${DONOR} will be used as an example to generate a WGTS, a TAR, and a pWGS report. The example commands and filesystem paths will generalize to other samples and projects.
Before Starting
Informatics pipelines must have completed as described in the Informatics Overview SOP.
The CGI clinical report lead reviews pipeline status in Shesmu and updates the agenda accordingly. Samples that have completed pipeline analysis will then be assigned to a CGI staff member by the clinical reporting lead. If the clinical reporting lead is unavailable, delegation responsibility falls to the CGI Manager, then the Director, GSI. This begins the Data Review and Reporting Procedure.
Set up a Djerba working directory
Analysis is carried out on the Univa cluster as the svc.cgiprod user and all work is to be completed under the /.mounts/labs/CGI/cap-djerba/ base directory. Set up the analysis environment as follows:
Log into a Univa cluster head node, with the CGI staff’s username. For more information on logging into the OICR vist OICR’s HPC school🔒
Switch to the svc.cgiprod user account using
sudo -u svc.cgiprod -ifollowed byqrsh, with appropriate options, to open a session on a compute node.
Load Djerba and its prerequisites:
module load djerba. It is normal to see a few warning messages on module load. If in doubt as to whether it has run successfully, runecho $?immediately afterwards to check the return code, which should be 0 (zero).Create a working directory in CGI space to contain intermediate files. The working directory will be contained within a base directory specific to the project, donor, and requisition.
Make a directory called
reportinside the working directory:$ WORK_DIR=$BASE_DIR/$PROJECT/$DONOR/$REQUISITION $ mkdir ${WORK_DIR}/reportTo generate an INI config file, use the ‘setup’ mode of djerba.py with the name of the appropriate assay (one of WGTS, WGS, TAR or PWGS). This will create a config file called ‘config.ini’:
$ djerba.py setup --assay $ASSAY --ini ${WORK_DIR}/config.ini --compact --pre-populate $BASE_DIR/$PROJECT/${project_name}-config.ini
Use the
--compactflag to generate an INI file with only the minimum required parameters. Other parameters may need to be modified, for example if report_version in the[core]section requires a value other than 1; in this case, the--compactflag may be omitted.Use
--pre-populateflag (or-p PATH) to specify the path to an existing INI file specific to the project. Its key/value pairs will be merged into the newly generated config.ini, automatically filling in those parameters so you don’t have to enter them manually. If there’s no project INI file yet, just omit this flag.
Example:
#example
$WORK_DIR=/.mounts/labs/CGI/cap-djerba/PASS01/PANX_1234/PASS01UHN-000
$PROJECT_DIR=/.mounts/labs/CGI/cap-djerba/PASS01
$ mkdir ${WORK_DIR}/report
$ djerba.py setup --assay $WGTS --ini ${WORK_DIR}/config.ini --compact --pre-populate ${PROJECT_DIR}/PASS01-config.ini
Detailed information on completing the config file is found in the dedicated assay sections.
Generate and Interpret the Report
Once a working directory has been set up, a report must be generated according to the assay listed in the requisition. Currently, Djerba supports the generation of clinical reports for the following assays: WGTS, TAR, and PWGS.
The instructions for generating reports for each assay are documented below. An example command line session is included at the end of each section.
Review the Draft Report
Review and confirm accuracy of non-PHI fields on draft report relative to current requisition in the Requisition System. Updates to a requisition may occur at any time prior to case sign out.
As listed in ISO 15189 (sections 7.4.1.6 and 7.4.1.7), clinical reports must contain the following information:
ISO Requirement |
Report Location |
|---|---|
Unique patient identification |
Footer, on each page of the report |
The date of the issue of the report |
Footer, on each page of the report |
Unique identification that all its components are recognized as a portion of a complete report and a clear identification of the end (e.g. page number to total number of pages). |
Footer, on each page of the report |
Identification of the laboratory issuing the report |
Header |
Name or other unique identifier of the user [i.e. requisitioner] |
Case Overview |
Any specific information necessary to describe the sample (e.g. source, site of specimen, macroscopic description) |
Case Overview |
Clear, unambiguous identification of the examinations performed |
Case Overview |
Type of primary sample |
Sample Information |
Sample quality and suitability that can compromise the clinical value of examination results |
Indications of any critical results |
Treatment Options |
Identification of the examination method used |
Supplementary |
Identification of the CGI Staff reviewing the results and authorizing the release of the report |
Generate QC Report
The draft clinical report is accompanied by a QC report, which documents the QC audit trail for the sample in question. The report must be generated after MISO has been updated with informatics QC results.
Generate the QC report using the “case report” button in Dimsum.
Under “Assay”, click on the assay (ex. REVOLVE - cfDNA+BC). Then, at the top right of the page, click on the green “QC Report’’ button.
On the new page, in the top right, click on the green “Print” button to save to pdf for uploading to the requisition system.
Investigate any warnings or errors in the QC report.
Upload to the Requisition System
The final step is to download the completed PDF report to a local machine, and then upload to the requisition system.
Upload the Djerba report document and the QC report document from Dimsum to the requisition system, as described in Uploading a Draft Clinical Report.
If needed, the Djerba PDF can be copied from the cluster to a directory on the CGI staff’s local machine. For example:
scp user@chickenwire.oicr.on.ca:/path/to/clinical_report.pdfIf files are downloaded, immediately delete the local copies of clinical and QC reports once it has been uploaded. This improves the security of the reporting process. In particular, it is intended to prevent a CGI staff from uploading a report for the wrong sample to the requisition system.
After all files are uploaded to the requisition system, CGI Staff will mark the Draft Report as ‘pass’ or ‘fail’ in Dimsum, according to the QM-036 Quality Control Approval Procedure SOP. This will signal to the Geneticist that the Report is ready for their review.
Revise a Draft Report
In the event that an uploaded report is rejected by the geneticist, CGI staff will receive an e-mail notification from the requisition system indicating that the report has been rejected, with general comments for the reason for rejection.
CGI staff will review the comments and, if necessary, repeat the above procedure to produce a new report with an incremented version (using the version parameter in the [core] section of the INI).
Amended Reports
A report that has been signed-out but that requires revision of metrics, interpretation, patient information, or other content edits must go through a re-accessioning process before it can be amended and reported.
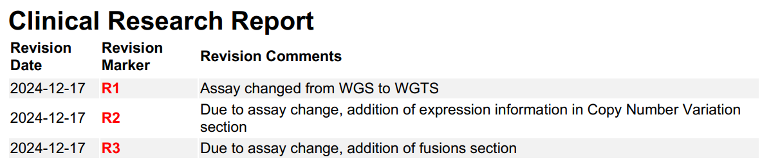
- Amended reports have:
A table at the top detailing the revisions. Example:
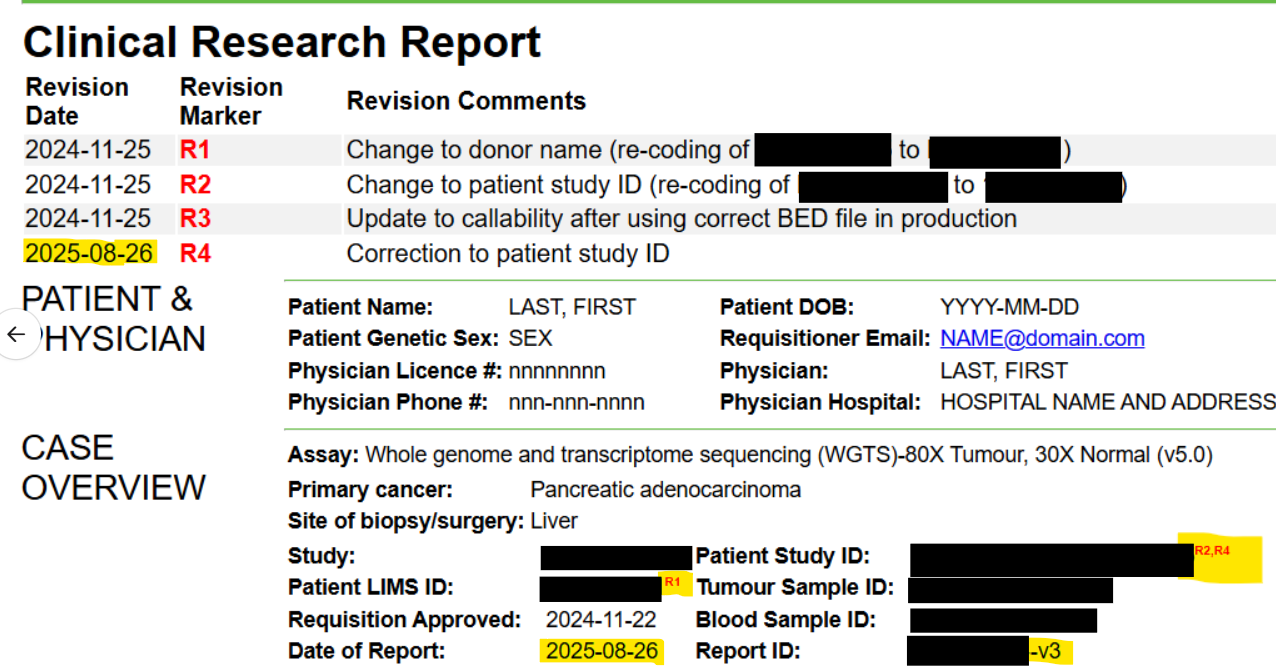
Red “R#” markers to indicate where in the report the revisions occurred. Example:

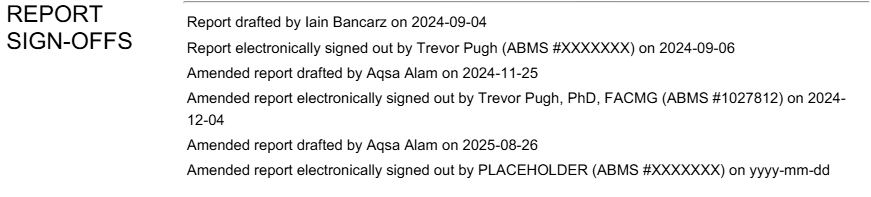
A record of all the sign outs for each amendment. Example:

An incremented version number (original report is
${Requisition_ID}-v1, first amended report is${Requisition_ID}-v2, second amended report is${Requisition_ID}-v3, etc). Example:
Note
In the case that the contents of the amended report are identical to the original report, the amended report does not need to be uploaded to the requisition system. Instead, document the comparison in a ticket or CAPA and notify the requisitioner that the case was reanalyzed without a change to results.
When amendments are necessary, the following steps must be followed, led by the CGI manager:
Contact the requisitioner
The requisitioner’s email can be found at the top of the requisition.
Briefly describe the reason for amendment (ex. callability change, purity change, addition or removal of variant, PHI change, etc.)
Request that the requisitioner rescind the requisition
Example email:
Hi, I’m [NAME], a member of the Clinical Genome Interpretation (CGI) team in OICR Genomics. Earlier, you submitted the following tumour sample requisition for the [PROJECT] project: [REQUISITION_ID], [DATE OF SUBMISSION]. After some discussion, we discovered [REASON FOR AMENDMENT]. We request that you re-open the submission so we can issue an amended report for this sample. Thanks, [NAME]
Once you receive confirmation that the requistioner has rescinded the requisition, contact a Tissue Portal (TP) member by Slack or email to re-approve the requisition.
When the requisition is rescinded by the requisitioner, the CGI team will no longer be able to view it in the requisition system until it can be approved by TP.
Contact the TP member via Slack or email with the requisition number for them to re-approve and provide the reason for amendment.
When the requisition is approved, it will again become visible to the CGI team on the requisition system as “Submission Approved”
Generate the new report using Djerba, being sure to specify the report ID with the incremented version number in the [core] section of the config.ini file:
[core]
report_id = ${Requisition_ID}-v2
The clinical report HTML will have to be manually edited to add the features of an amended report.
Use the following HTML code to make a table (the
<span>tags will help guide the placement of the table in the HTML):<h1>Clinical Research Report</h1> <span DJERBA_COMPONENT_END='report_title' /> <table width=100% style="text-align:left; margin-left: auto; margin-right: auto;"> <thead><tr> <th width="12%">Revision Date</th> <th width="13%" >Revision Marker</th> <th width="75%">Revision Comments</th> </tr></thead> <tbody> <tr style="background-color: #f2f2f2;""> <td >2024-10-17</td> <td ><strong style="color:red;">R1</strong></td> <td >Correction to Estimated Cancer Cell Content in Sample Information</em></td> </tr> <tr style="background-color: #f2f2f2;""> <td >2024-10-17</td> <td ><strong style="color:red;">R2</strong></td> <td >Removal of MN1 from Shallow Whole Genome Sequencing</em></td> </tr> </table> <span DJERBA_COMPONENT_START='patient_info' />
Add the revision markers (R1, R2, R3, etc.) as a superscript next to the reportable elements that have been changed.:
<sup><strong style="color:red;">R1</strong></sup></a>
For additional amendments, keep a continuous record of all changes in the table (i.e. do not delete or overwrite table rows). The date of the report should reflect the date that the current amended report was drafted. If the new revisions affect previous revisions, add a comma between the revision markers as below:
Add the amended sign offs below the original sign-offs. For example:
<tr>
    <td width="33%">Report drafted by CGI Member  on 2024-09-26</td>
</tr>
<tr>
    <td width="33%">Report electronically signed out by PLACEHOLDER (ABMS #XXXXXXX) on yyyy-mm-dd</td>
</tr>
<tr>
    <td width="33%">Amended report drafted by CGI Member on 2024-10-17</td>
</tr>
<tr>
    <td width="33%">Amended report electronically signed out by PLACEHOLDER (ABMS #XXXXXXX) on yyyy-mm-dd</td>
</tr>
<tr>
For additional amendments, keep a continuous record of all amended sign-offs by adding the sign-offs for the current amendment directly below all previous amended sign-offs:
The normal Djerba rendering method will not function. Instead use a standalone PDF converter, such as the script html_to_pdf.py from the djerba_prototypes repository. The PDF produced must have the standard Djerba page footer, including the report ID and the current date.
To upload the amended report, go to the requisition, click edit, and upload the newly generated amended report. Make sure the version number is incremented.
Inform the geneticist through Slack or email that the report has been submitted. They will not receive automatic notification.
Failed Reports
If a case fails any QC metrics or fails for another reason, a failed report must be submitted to the requisition system.
Failed WGTS Report
To generate a failed report for WGTS, fill out the following ini (note: purity, ploidy, callability, and mean_coverage under the [sample] plugin can accept NA if required):
[core]
[input_params_helper]
assay=
donor=
requisition_id=
study=
project=
oncotree_code=

primary_cancer=
sample_type=
site_of_biopsy=
requisition_approved=

[report_title]
failed = True

[patient_info]

[provenance_helper]

[case_overview]

[sample]
purity =
ploidy =

[summary]
failed = True
summary_file = results_summary.txt

[supplement.body]
failed = True
Edit the results_summary.txt file to describe the reason for failure. Ensure that the reason for failure is clearly identified in the report summary. For example:
“The patient has been diagnosed with Pancreatic Adenocarcinoma and has been referred for the OICR Genomics WGTS assay through the PASS-01 study. A quality failure report for this sample is being issued due to the informatically inferred tumour purity of 25%: this value is below the reportable threshold of 30% for the assay.”
Refer to how to write a Genome Interpretive Statement🔒 for more examples.
Run the config.ini as usual with the Djerba command:
djerba.py report -i config.ini -o report/ -p
Failed TAR Reports
If the targeted report fails any QC metrics or fails for another reason, a failed report must be submitted to the requisition system.
To generate a failed report for TAR, fill out the following ini (see Djerba INI configuration for ini parameters):
[core]

[tar_input_params_helper]
donor=
project=
study=
cbio_id=
oncotree_code=
patient_study_id=
tumour_id=
normal_id=
primary_cancer=
site_of_biopsy=
known_variants=
requisition_id=
requisition_approved=
assay=

[provenance_helper]
sample_name_normal = None
sample_name_tumour = None
sample_name_aux = None

[report_title]
failed = True
[patient_info]
[case_overview]
[summary]
failed = True
summary_file = results_summary.txt
[tar.sample]
[supplement.header]
[supplement.body]
failed = True
Ensure that the reason for failure is clearly identified in the report summary. Refer to how to write a Genome Interpretive Statement🔒 for examples.
Run the config.ini as usual with the Djerba command:
djerba.py report -i config.ini -o report/ -p
Failed pWGS Reports
A failed report may be generated for this assay if:
The distribution of insert sizes does not follow those outlined in Review Sample Quality, and/or
The number of candidate SNVs is below 4000
The WGTS report failed
The failed report is generated according to the same procedure as a TAR Failed TAR Reports
remove
[pwgs.analysis]add
[failed_report]Set the following fields in the INI:
primary_cancer = Undetermined
assay = PWGS
study=PWGVAL

[report_title]
failed=True
Run the config.ini as usual with the Djerba command:
djerba.py report -i config.ini -o report/ -p
Workaround for Failed WGTS and TAR Report Without Full-depth Sequencing
For any WGTS and TAR cases that failed before full-depth sequencing, refer to workaround for failed WGTS and TAR report without full-depth sequencing🔒 for further details and instructions on how to generate the report.
Additional Considerations
Variant Classification
Human sequence variants are reported using HGVS nomenclature and include the HUGO Gene Nomenclature Committee (HGNC) gene name, and a standard versioned reference identifier to a corresponding transcript and protein. The variant chromosomal position is also reported.
OICR Genomics’ reports cover all cancer genes as defined by OncoKB. The OncoKB cancer gene list is a collation of cancer associated genes according to multiple sources including: MSK-IMPACT trial, Foundation One CDx panel, Vogelstien et al., 2013, and the Tier 1 Cancer Gene Census gene list. Variant classification follows OncoKB AMP/ASCO/CAP Consensus Recommendation.
OICR also annotates the report using NCCN. The NCCN Compendium is a manually compiled list of somatic alterations for reporting in specific cancers. For Plasma Cell Myeloma (PCM) cases, we report t(4;14), t(14;16), t(11;14), and t(14;20). For ovarian cancer (OVARY), we report Homologous Recombination Deficiency (HRD).
Variant interpretation inputs to CGI reporting will be updated to keep pace with major releases. When variants have been reclassified, our interpretation and report will be based upon the latest version. New reports will contain the most current variant classification available at the time of drafting the report. We will not issue updates to previously signed-out reports.
The lab maintains a record of identified variants and associated interpretations for each patient in a structured file system. In addition to the maintenance of patient reports, all data used in the generation and interpretation of each report is retained. This includes all annotated variants which have been reviewed by genome CGI staff.
Incidental Findings
As only OncoKB level 1-4, Oncogenic and Likely Oncogenic variants, R (resistance), and NCCN-prognostic variants are reviewed, and the results of this review are presented in the clinical genomic report, incidental findings are not examined or reported.
Analytical Methodology Changes
Analytical methodology changes will follow the processes laid out in QM. Continuous Improvement Plan and QM. Computer System Maintenance.
Unless a new requisition is submitted, OICR Genomics will not issue new updates to previously signed-out clinical genomic reports.
If OICR Genomics changes its analytical methodology to correct major errors or oversights that significantly impact the final genomic report, that information will be communicated to both previous and current clients. Affected clients will be emailed to inform them of the change and any effect this may have on their existing or future genomic reports.
Change Log
June CR-119 update (#14) by Morgan Taschuk at 2026-07-21 19:22:33
* Remove references to mini-Djerba * Improve changelogs by pulling in the actual changes for each page with sphinx-git
Update instruction wiki for failed WGTS/TAR without full-depth sequencing (#7) by Hanlin Chen at 2025-12-11 19:40:29
Attaching instruction wiki page for failed WGTS/TAR without full-depth sequencing.
Fixing title underline issue by Hanlin Chen at 2025-12-05 21:02:20
Minor text fix by Hanlin Chen at 2025-12-05 20:51:28
Update additional instruction wiki for failed WGTS/TAR without full-depth sequencing by Hanlin Chen at 2025-12-05 20:46:03
Add amended v3 information (#2) by Aqsa Alam at 2025-10-09 19:49:35
Got Oumaima and Emma’s approval that this was clearly written Will discuss change at CGI meeting as well
Update data-review-and-reporting.rst by Aqsa Alam at 2025-10-09 19:05:57
Update data-review-and-reporting.rst by Aqsa Alam at 2025-09-30 19:25:23
Update data-review-and-reporting.rst by Aqsa Alam at 2025-09-26 18:31:09
Update data-review-and-reporting.rst by Aqsa Alam at 2025-09-26 18:20:55
Update data-review-and-reporting.rst by Aqsa Alam at 2025-09-26 18:18:42
Add changelogs to every page; add a note about identical amended reports for CAPA-221 by Morgan Taschuk at 2025-09-15 20:10:46
TM-0005 doc adjustments (#1) by Oumaima Hamza at 2025-09-15 18:23:34
Co-authored-by: Oumaima Hamza <ohamza@oicr.on.ca>
Reorganized so each SOP has its own section by Morgan Taschuk at 2025-08-18 19:08:34