Study Administrators
The study specific administrator has no access to PHI but can build requisition forms, configure study-specific roles, audit submission logs, and edit email templates.
Configuring Study Specific User Roles
Users for each study requisition form must be defined and access granted or revoked by the Administrator; refer to Requesting a User Account/Access Change Request section.
Adding a User
Navigate to the “Manage Forms” tab and select the study specific requisition form.
Click on the subheader “People.”
For each available role, assign an institutional email address by clicking “Add to Staff List”. A popup box will appear. Multiple email addresses may be added at once to a specific role.
User roles may also be edited under the “Actions>edit” menu. A popup window will appear and enable assignment of multiple roles to a single user, or to change their individual role assignments within a study specific requisition. Alter the user’s roles by marking or unchecking the roles that apply.
Removing a User
To remove a user from a study specific requisition, click the drop-down in “Actions>Edit” and select “Delete”.
Bulk User Role Removal
Multiple users may also be deleted at once (bulk) by selecting the users in the table. From the Bulk Actions menu, select “Delete”, and “Apply”.
Reviewing Master Role Records for Study Specific Requisitions
For each study requisition, assigned user roles (Accessioner, Sign Out, Requisitioner, Administrator, Laboratory) may be reviewed and/or edited by navigating and clicking on the respective role within the summary banner. Role specific bulk user role Addition/Removal may be completed with this feature and/or editing of a single role.
Building/Modifying Requisition Forms
Configure Requisition Form Title, Description, Requisition ID (Study Code)
From the cloned form gear box, select “Form Settings” or select “Set Up”.
Enter the “Form Title” of the new requisition form following the template “Study_Name Requisition Form”; see figure below for subsequent text fields requiring configuration.
Enter a custom study specific description in “Description” text field if preferred.
Specify a study specific “Form Key”, ie for the OCTANE study, “OCT”; this letter string will appear on all requisition IDs and may include a site-specific code for master studies with multiple sites.
Specify a “Submission Title Format”, or how the requisition ID will appear on Forms. For example, “OCT-[numberid]”, would appear as OCT-0001.
Click “Save”.
Add/Configure Form Section Headers (Titles)
Section Form Headers segregate related questions with a section specific title. To create or configure a section header, follow these instructions:
From the Study specific requisition form navigate to the “Build Form”.
From the right-hand margin, under “Sections”, select “Sections”. A popup will appear. Specify the section header title. A section description may be added and will appear below the title on the requisition form. Click “Save”
Define Role Based Access to PHI or Processes Specific to a Forms Section
Certain sections of a form may contain PHI that must be restricted to authorized roles (see Role Based PHI Access). To define a section as PHI:
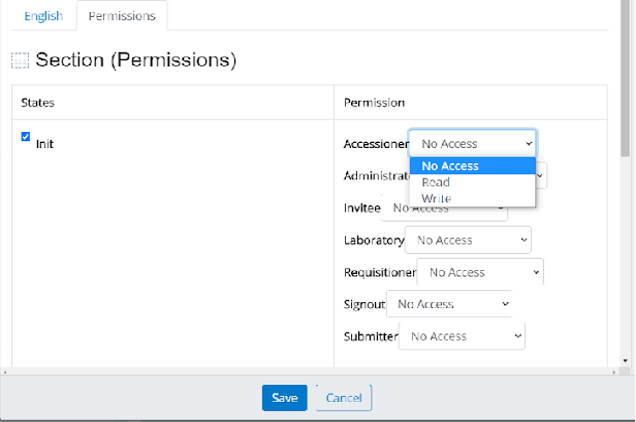
When creating a new section or when editing an existing section (select the edit icon (pencil), a popup will appear as seen below. Select the “Permissions” tab.
Mark the state (ie the process that the section relates to): init, submit, delete, reopen, withdraw sample, approve, deny, withdraw sample, approve, deny, withdraw consent, draft report ready for review, report accepted-signout complete, withdraw consent, draft report not accepted.
Under “Permission”, specify each user role that may view and/or edit a section by selecting: “No Access”, “Read” only or “Write”, see below; this must be specified for each process stage.
Adding/ Configuring a Requisition Form New Text Field
The “Build” page allows extensive customization of any form.
To add a new text field, select “Text” under “Form Field Types”.
Add text to the “Label/Question” field as it is intended to appear on the form. A “Note” may be added (optional) and will appear as a text bubble to the right of the text field. See below.
Text Field inputs may be restricted by specifying a “Text Input”. Character entry may be restricted to text, numeric, email address, email addresses, or URLs. For numeric entries, input ranges may be specified and units.
Obligate Text Field Configuration
If a text field must be populated with information by the user, a condition may be set requiring data entry. This forces the user to enter data to enable the “Save” feature.
To force user data entry, select the “Settings” tab
If data entry is required, mark the option “Make this a required question” and click “Save”.
Altering the Order of Text Fields
Navigate to the study specific requisition form via “Manage Forms”>Study specific Requisition>”Build”
Drag the field text box to the desired order and click “Save”.
Editing General Text Field Options on Cloned Requisition Forms
All study specific requisition fields may be customized by clicking on the edit icon (pencil ). These activities may be conducted from the “Build” page.
To edit the text of a given text box as it appears on the requisition form, click the edit icon. Edit the text field “Label/Question”. A “Note” may be added and will appear as a text bubble when a user hovers their cursor over the respective text field. See Adding/ Configuring a Requisition Form New Text Field. If required, specify/alter if text entry is required by marking/unmarking the option “Make this a required question” and click “Save” as in Obligate Text Field Configuration.
Adding or Configuring a Form’s Multiple-Choice Selection Field
Forms may contain options for users to select materials for submission. To create or configure a multiple-choice dialog box, follow these steps.
Under Form Field Types, select “Multiple Choice”. Set the text box “Label/Question”. Under “Multiple Choice Field” select “Choose multiple (checkbox)”.
Within the “Options” text field, each option must be entered using the following text markup, where “1” is the unique identifier of the option, and “|” demarks the checkbox from the text field
1|250µl of buffy coat
2|1 x 10ml whole blood (STRECK or EDTA)
3|3 x 10ml whole blood (STRECK)
If you are migrating this form from a previous version, do not split up the unique identifier and the text field. The unique identifier is used by the requisition system to record which option was selected.
If this is a required response, under the “Settings” tab, select “Make this a required question”.
Add a Downloadable File (PDF) to a Study Requisition
If a guidance document for a particular text field is requested by a user, a downloadable PDF may be associated with a text field, by uploading a PDF to the form template using the “upload” option.
Add Ability to Upload a File (PDF) to a Study Requisition
A user role may require the ability to upload a file/document to a specific requisition. Note, if access to the file is restricted to specific user role or contains PHI, configure the section header user role permissions as specified in section “Define Role Based Access to PHI or Processes Specific to a Forms Section”. To configure this option:
Navigate to Build>Form Field Types>File Upload.
Enter text into the “Label/Question” dialogue box. Add a note if a description of the field is required.
Specify the maximum file size, permitted file types (png, jpg, pdf).
From the “Settings” tab, mark “Make this a required question” if the uploaded document is a required field. Click “Save”.
Add a Calendar Field
Certain dates may be considered PHI (procedure date). To configure role-based visibility of a date, configure the section header user role permissions as specified in section “Define Role Based Access to PHI or Processes Specific to a Forms Section”.
Navigate to Build>Form Field Types>Date
Enter text into the “Label/Question” dialogue box. Add a note if a description of the field is required.
Publish a Study Specific Requisition Form to Users
A cloned study specific requisition is only viewable to the Administrator during draft phases. Upon completion of a Requisition Draft, the Form must be published. To publish a form:
Navigate to “Manage Forms>Study Specific Requisition”.
Select “Preview” to view the final format of the requisition as it will appear to users. Edit as necessary to finalize the draft.
Select “Publish” from the navigation menu.
Unpublish a Study Specific Requisition Form
Navigate to “Manage Forms>Study Specific Requisition”. Select the gear icon (right upper margin) and select “Unpublish”.
Audit Study and Patient Specific Requisition Form User Actions (Log)
Navigate to Manage Forms>Study Specific Requisition.
Form the gear icon in the upper right margin, select “Download Submissions Logs”. An excel sheet is generated which specifies date and time of action, user who performed action, associated email account, requisition form, requisition ID, and action performed.
Configuring Role Based Email Notifications
As action items arise from initiation of a requisition submission through to approval of a clinical report by a Geneticist, responsible user roles receive notification emails that either confirm a completed activity or notify of a required action.
For each study requisition, role-based email notifications may be configured. Default/standard email notifications are preconfigured via the template clinical study requisition form. When a requisition form is cloned, it may then be further configured to notify additional users and/or provide study specific email notifications. Customization of email text and/or subject headers may be requested via the Administrator.
Each related series of email notifications are grouped thematically by process or action (form stage) including submission, withdraw submit (mistaken Requisitioner submission), approval (role-based action), withdraw approve (patient consent withdrawal), data ready for review, Sign Out complete, Sign Out not accepted (amendment alert). These notifications occur upon completion of critical role-based workflow stages.
To configure emails:
Navigate to the “Manage forms” tab and select the study specific requisition form.
Click on the subheader “configure”.
Under the “emails” column, click “edit” on a particular “Form Stage-Emails” as seen below.
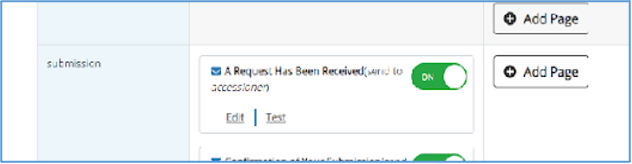
Various fields may be edited from the edit window, see below. Various settings are preconfigured upon cloning of a study requisition template.
Change the sender “email from” address, i.e. the email address form which all notification emails are sent
Configure/alter email recipients for a given email notification. If additional roles require notification at a particular forms stage, or users request to be notified of other user role actions, these users may receive notifications by marking the user role(s) specified via “Email Recipient (s)”. Assigning requisition user accounts to specific roles is detailed in Configuring Study Specific User Roles.
Email subject header may be modified by editing the text under “Email Title/Subject”
Email content (text and html format) may be edited.
Copy html markup within the “Email Body” field. Paste text to Visual Studio Code (Microsoft). Save text with file extension .html. HTML markup will become color coded. See below.
All text that appears “white” is visualized on the email as text and may be altered.
Email html markup may also be configured, including text boxes and fields. This may include the format of “submitted on”, “submitted by”, Email header fields, “Next Steps”, login button text, email signatures etc.
When editing markup in Visual Studio Code, the draft changes may be reviewed by right clicking on the text field and selecting “open with live server”. This will open a browser window and display the email as it would appear if sent from the Requisition System. Changes to the text (html markup) may be saved to a local directory for future reference.
After completing and reviewing edits in Visual Studio Code, copy the html markup to the “Email Body” field.
Select “save” at the bottom of the “Edit Email Notification” configuration window.